Showing posts with label DIY. Show all posts

Sunday, September 15, 2013

Adventures in Crochet

I learned to crochet at school in 5th grade.

This little martian sheep/bumble bee was inspired by one of my cousin's designs (not an original, sorry..), I made it for a little 3 year old friend

It's like riding a bike, you never forget...

Dressing up a fake indoor plant from IKEA

I also watched my grandmother make doilies ever since I can remember. She also used to crochet clothes for my barbie dolls which I *loved* her for.

I turned it into a hanging planter, inspired by Dottie Angel

I tried to learn how to knit but it was like learning to write with my left hand! Too clumsy...

You can make hanging planters from doilies without having to crochet a thing, check out Dottie Angel's blog for inspiration.

Also, DIY Neon Plant Pots.

Sunday, August 4, 2013

DIY: Neon Plant Pots

I am a big fan of the neon-on-neutrals movement:

Images via: The Proper Pin Wheel,  Bird and Feather & Dellie
So when I ran into a pile of dismissed terracotta pots on my street, I took the chance to try and re-create some of these beauties above.


If you are re-using some of your own pots, or picking up free ones from the street like I did, make sure you give them a good scrub to kill the bacteria currently living in them (I used a bleach solution for this)...


I had some acrylic pale grey and canary yellow left over from a different project. Two coats of the pale grey alone looks rather classy:


Some strategically placed painter's tape...


And voilĂ ! I am extremely pleased with the result.

There is a lovely woman and her father at Addison Road Markets in Marrickville who sell plants and herbs of all sorts, including a 6-pack of various succulents for $20!


I am very excited about my new succulent plants but have never actually looked after any before. If you have any tips for me, please share in the comments.


Sunday, May 13, 2012

Upholstering a chair: part 1

This post, and subsequent parts, tells the story of my numerous attempts at upholstering an old chair.

I will start by stating that a much better and more detailed step-by-step was hosted by Little Green Notebook in NYC. So read that too!

I found this chair dumped on the curb in our street:


As you may or may not know, I am a big of old things and old furniture. And an even bigger fan of free things! So I took it upon my self to give this bad boy a brand new look.

The first step was to unscrew the seat, and remove the 2,677,831 staples that were holding the vinyl to the wood (of both the seat and the back).

Friends allow me to warn you: this is BACK BREAKING work. Yes, you will endure a lot of back pain, and your knuckles and arms will be sore, and you'll step on staples and scream sometimes. Professionals have a garage or studio where they can work with the chair at chest height, which I suppose would be nice... but at home we just worked on the floor.

By we, I mean my mom and I. She was visiting at the time and helped me enormously, in fact I dare say she removed 80% of those annoying little staples all by herself. Bless her little hands.

Next! I had to sand down the current finish on the chair, by hand. M helped with this as well, and this time we worked outside.


I don't know what kind of lacquer exactly was applied on the chair, but as it turned out it was a really thick layer of it.

This took many hours of brute work which could have been saved had I had a power sander...

Wipe with a wet cloth and time to apply the new stain!


In this picture I was working at my neighbor Lisa's backyard, because she was also sanding and staining her old chairs at the time (one of hers is on the left).

Here comes the fun part!


Or so I thought.... turns out the old varnish was still on the chair! It was just deeply, deeply engrained in the wood. So the chair did not take well to the new stain, at all. I tried all different spots of the chair, I tried different brushes and sponges and different stains. I tried 3 coats to see if it would even out eventually, or end up with some weird cool look. But no,  nothing worked and it looked like crap.

So back to the drawing board.

Coming up on part 2: spray paint! :-)


Thursday, March 17, 2011

Maximum wattage

DIY electric mixer!

Courtesy of my friend JM Custardcrusher*.

Supplies: a power drill and a fork.

Insert the fork into the power drill as if it were a drill bit. Make sure it fits snug so it doesn't come out at all when you pull it hard. Turn on the power drill and durrrrrrr.


Disclaimer: this should probably not be attempted by anyone. Instead you should get an electric mixer ;-)

*That's the alias he chose.

Wednesday, March 16, 2011

Gift ideas

Our cool neighbor friend celebrated a birthday last weekend and we discussed many a gift ideas for this chap. We know he enjoys wine and cocktails, but M and I (mainly I) decided that that was too cliche. We thought of many other nice things available for purchase but didn't want anyone to feel uncomfortable about "buying" something... so instead I thought I could make something!

The gift receiver likes spicy food, he is also Australian born and raised so he likes barbecuing (that's a given for most Aussies), so I thought I could combine both likes into a single spicy, sweet and tangy homemade barbecue sauce!

I have made barbecue sauce before, it is ridiculously simple, but I personalized it and gave it a kick by adding two chopped up chipotle peppers in adobo, plus a little extra of he adobo itself.


We bottled it up and I scribbled some letters on a brown paper bag to create a personalized label (the pixelated area said "from [our address]".

I included the recipe in that little piece of paper that I tied to the bottle, you know, in case he wants to refill it.

This is another excellent reason to always keep your glass bottles and mason jars around. Now you go make something for someone.

PS. The original recipe is here, but remember I added some chipotle peppers in adobo for spice.

Saturday, February 12, 2011

More furniture hunting (and reverse garbage)

The never ending acquisition of old, cheap or free furniture continues.

There's a shop run by a very kind man with acute hearing deficiency on the corner of Addison and Illawarra in the Sydney suburb of Marrickville. His shop is a plain cement room and only opens on weekends but the prices are fair and the stuff speaks to me more often than not. I bought from him a bedside table ($10), a bookshelf ($30), a rug ($10) and a small ceramic bathtub (decorative, $5).


What I liked about this table is: 1. It has a drawer for stuff you want to hide AND a shelf for stuff you want to display, 2. The legs are not entirely straight all the way down which makes it more interesting, 3. The hardware is original and pretty.

Of course I wouldn't be blogging about it if I hadn't changed something :-) so I spray painted it red! It has these beautiful cracks on the top which the paint didn't quite fill and they give the table  great look!


I think it fits much better with my personality now, I'm into colorful stuff lately...


By the way, that lamp is from this insane place also in Marrickville and very near the same shop called Reverse Garbage. The price of the lamp was 3 dollars but then I had to spend another 13 replacing the lamp socket which was cracked. The original lamp shade was a plain (and dirty) white, so I followed this *amazing* tutorial on how to cover a lamp shade with fabric.

Let me tell you some more about Reverse Garbage. There is where the items that are garbage but not really garbage go to die. Things like plaster, art, furniture, boxes, glass bottles, costumes, paint, chemicals, ceramics, etc, and they are all for sale! It is a crazy place! Words cannot begin to describe it so please let me take you on a photo tour:

When you see this incredible sculpture, you have arrived at the right place.
Theatre costumes?

Wigs, shoes and piles of ridiculous clothes.

Metal drums, ceramics...

Doors...

Pink styrofoam bags!

If you are throwing an Oscars viewing party, you'll really need these, however overpriced.

Mannequins, posters, art frames.

You name it...
If you are in the Inner West or Marrickville area, do go check out these places, it'll be worth the visit!

Tuesday, December 14, 2010

DIY simple upholstering project

Before I get started, I wanted to announce that the chosen name for that precious kitty is Murka.  It was suggested by M's mom and it is a common name for female cats in Russian speaking countries. It means something along the lines of "girl who purrs". At least that is what M says, and I guess I have to trust him on this one because I really like the name. You see, the cat is a purring machine, it just doesn't stop purring, so it is definitely fitting.

Next up is my first attempt at upholstering something! Remember that little stool that I wanted to pair up with my desk? (bottom photo). Well I finally got around it and here it goes.

You will need: a small stool, a pillow or pillow stuffing large enough to fit the stool, scissors, decorative buttons and fabric, a large needle, thread, upholstering tacks/nails and a hammer.

I took my needle and thread and marked the places where I would like my buttons to go, also tightened the threat with a little knot in order to make little dents on the pillow.


I cut the fabric so that it would cover one face of the pillow, and also go just over the edges of it. I held it on the pillow using pins, and proceeded to attach my buttons.


This is a Japanese fabric that I found on sale at the Beehive Gallery...


Then I placed the pillow, fabric side up, on the stool and measured the length of the edges. I started pushing some of those upholstering tacks through the fabric to mark where the edge should be.


Start hammering those suckers in! Always start with the center, and do edges first, leaving room around the corners, leave those for last.


I wanted the fabric to be nice and taught, but the pillow wasn't firm enough, so I just went meh... It fits nicely around the pillow, but it is not by any means taught... maybe next time I should stack up two of those pillows. NOTE: the tighter you make it, the harder it will be to keep the nails in place for hammering.

Then comes the corners... pardon my French but those corners were a bit#h. I took me a long time to figure out what to do, and I am still not really convinced that I did it correctly... I was learning as I went... but basically I tried pulling in the corner tight and folded it under the pillow. Then I brought what I had left over from the edges and tried to fold them nicely and around the corner.

I know it sounds complicated, to me it was, maybe a picture would help:


It is harder than it looks, trust me. Also, the corners came out all different, gives it away that this was a "craft" project.

And finally the end result!


The feet are not crooked, they are adjustable is all. This little gal was helping me all along and she wanted to be in the pictures:


So that's the stool :-)

While I was at it, I took some photos of our favorite part of the house. This is the mantle in our living room, all decked out with a Holiday tree and family photos.


Maybe one day I can show you the rest of our mess...


Monday, November 15, 2010

Garden update...

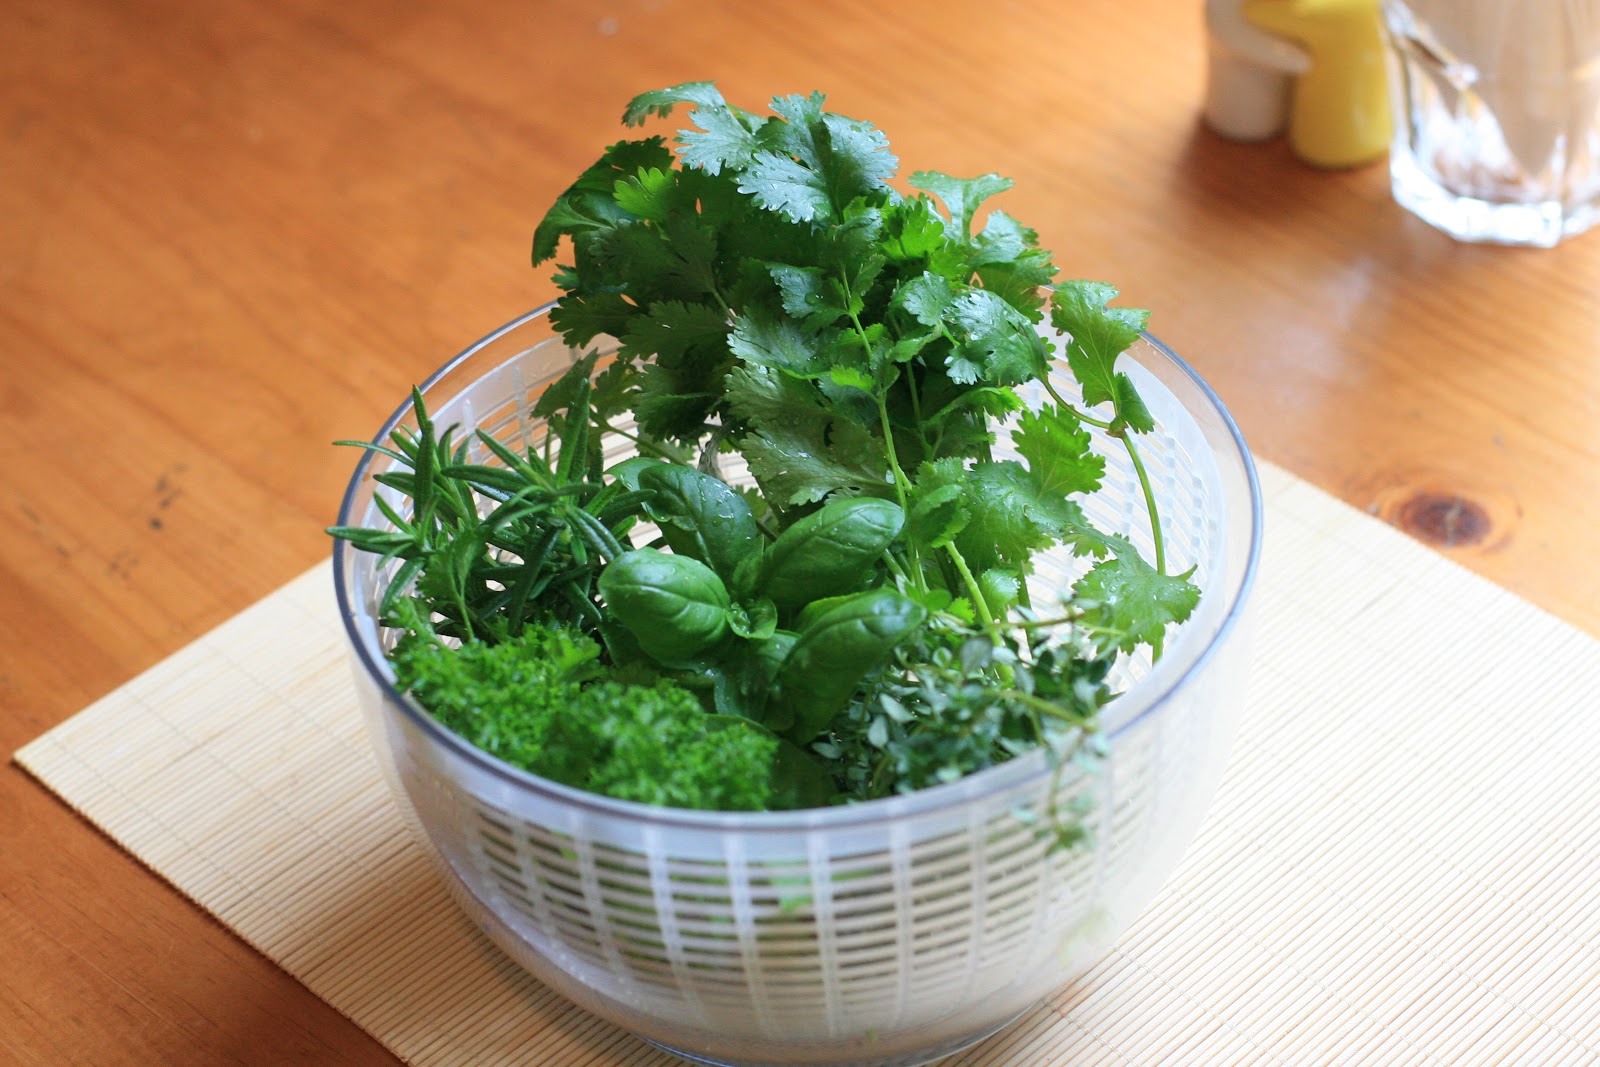
Harvest day!


I know what you are thinking: daaaaaaaaannnnnng guuurl!

The coriander grows insanely fast, followed by the lemon thyme, the parsley and the basil. The rosemary is lagging way behind, it honestly grows a bit too slow.

My herbs are alive! All of them in fact! they are alive AND delicious, to the point that the pests love them too!

Yeah, yeah, yeah. I was freaking out in my last garden post. I spoke to some garden avid friends and also went to my local nursery to discuss the matter of pests. The inevitable truth of the matter is, if you have delicious leaves growing outdoors, somebody is going to want to eat them. I just need to be on top of my garden to control the spreading of pests so I get to eat the herbs before they do!

Each herb has a different loving critter. White flies love my coriander and basil, aphids (the tiny green ones I spoke of before) are fans of the parsley, there are teeny little light brown worms (unidentified as of yet) who feast on the lemon thyme and fortunately the rosemary hasn't had any pests so far.

I am now using 2 products on the garden: the first is the extract of the pyrenthrum daisy, in spray form, which has been used as a pesticide for centuries. This controls all of my present pests and it works quite well, they start dropping dead and becoming compost within 10 minutes of spraying. The extract of the daisy is not meant for human consumption, and the manufacturer recommends not to harvest the day after spraying. Therefore I usually spray immediately *after* harvesting (about once a week). Alternatively you can also plant the pyrenthrum plant around and in between your plants and this will keep pests off, but the nursery didn't have those seeds, just the spray.

The second product I am successfully using is an eco-fungicide whose active ingredient is potassium bicarbonate. This is to treat and prevent powdery mildew and other forms of fungus (which you may not readily see on the ground, but can live attached to the roots or cause discoloration of the leaves). The fungicide comes in powder form and I dissolve about a teaspoon in 1 litre of water and spray it once a week (on a dry day). The fungus sometimes originates from overwatering, too much humidity and not enough air flow. I always let the ground dry completely before watering my plants again, but if your plants are outdoors and potted like mine, you simply cannot protect them from rain.

{harvesting your herbs}

Using some sturdy scissors cut the coriander and parsley at the base of the stem. More stems will grow from the ground up. The thyme and rosemary should be cut at the base of that branch, as more leaves/branches will branch off at random places. The basil grows strikingly like a binary tree, from each leaf two more will grow. Thus it is best to cut it at the base of the leave.

{storing and eating}

I soak my herbs in water for at least 20 minutes to make sure all uninvited guests will drown. Then I carefully inspect each leave and stem and in batches give them a couple of spins and rinses using a salad spinner.

The best way to store herbs in the fridge is wrapped in a damp paper towel inside a ziploc bag or tupperware. I read that you can freeze them for up to 3 months as well, and if you would like to dry them, it is best to do that right before the plants are blooming, when they are at their richest in delicious natural oils. I think I will try to do that when the time comes.

This post was very wordy and less picturesque, but I hope it was at least interesting and useful to someone out there...


Friday, November 12, 2010

1960's chest revisited

Remember my Italian treasure chest?

Pretty much everyone agreed that the old paper inside had to go, and go it did!


It took me a while, and it is FAR from perfect, in fact it was really awkward to cut and glue at times, and for some parts I ended up using many pieces of paper to cover a single area... I didn't want to do a DIY on this precisely because I sucked at it so much, I'm the one who needs a DIY!

One thing I can say is that it smelled... well... like it was 50 years old. You know that old musty grandparent house smell? Yeah, well it took about 6 sprays of Febreze (the Aussie version anyway, it's called Oust) to get rid of it, always letting it dry completely between sprays.


Hope you like it.

Have a nice weekend!!!

Monday, November 8, 2010

DIY cake stand

I saw this DIY on a different blog, but for the life of me I can't remember which one. I looked it up and it is actually a semi popular DIY, so no ground breaking techniques here.

What you will need:
  • A plate (any plate you like, mine was $0.50 from a thrift store)
  • A candle holder (any candle holder you like, mine was $0.50 from the same place)
  • Strong glue: I recommend super glue or epoxy
Clean your plate and candle holder and make sure they are dry.


Apply glue according to directions (fast if you can, since it will dry quickly) on the edge where both items will come together. Place the plate on top of the candle holder and apply some pressure. Best it is when you place a heavy book or cutting board on top and leave it for 30 minutes while it dries.


Finito.

By the way we finally got our shipment from Zurich and I was able to retrieve all of my bakeware. Of course I immediately had to make cupcakes to display the cake stand in use. 


These are peach bourbon cupcakes (recipe here) and in my humble opinion they are scrumptious. The perfect hint of bourbon and peaches all in one. The recipe was for 12 cupcakes but my cups were a bit bigger than the norm so only 8 came out.


Monday, November 1, 2010

garden help!

So my herbs are growing at an excellent rate, and I have even enjoyed some basil and thyme already but now I have a problem :-(

There is a funny white mould or mildew growing under the parsley, but only under this one, the other herbs are fine.

What is worse, there are pests on the parsley too, teeny weeny little green guys. I don't even know if they move, but they are there.

This was a short lived success...

Edit: yes, I did look online already and it could be a number of things... I think I'll go to the nursery again and ask for help.

Wednesday, October 27, 2010

DIY herb garden


I want a pet. A cat, dog, rabbit, parakeet, I don't care what. But unfortunately the house is a mess and I don't have a job, both of which are deterring us from adopting a little something furry. I am looking for a job, to those who are interested, I have been applying and making calls, dealing with rejection. Don't give up on me though! I'm coming workforce! But if you do have a job opening in Sydney you would like me to hear about, just drop a me line :-)

So, the next closest thing to a pet I could think of was a plant. I am terrible with plants but I wanted to give this another shot. When I say terrible, I mean awful. I once had a plant that committed suicide, when I got home it was there, dead, on the floor. It had jumped all on its own accord. 

This time I wanted to do it properly, and ask for help, not just online help but human help. So I went to a nursery to talk to someone about how to grow a herb garden. Because that is what you do with your pets, right? you eat them.

The first thing the nursery employee did was laugh hard on my face at the way I pronounced "herb". I said "erb" as if the 'h' was silent (which by the way it is in my mother tongue). After she dried her tears and got a hold of herself, she made the point to mock me some more by continually repeating "H-erb garden", you want to grow "HHH-erbs, for a HHHHHHH-erb garden".

Then she said all I need is water, sunshine, a good pot, and good soil. AHA!!! soil!!!! I never did anything special about soil before I just used dirt. I am sure some of you guys learned this in kindergarten but I didn't. Potting mix comes already fertilized and contains some fancy shmancy slow release nutrients which keep the soil rich and tasty for 6 months, aka a full harvest. I bought the *premium* potting mix, nothing less for my little friends. I bought 10 liters but ended up using slightly less than 5.


I chose my favorite herbs first: cilantro (here referred to as coriander), parsley, basil, rosemary and lemon thyme. I was going for thyme when I picked the plant, but turns out I chose lemon thyme: looks like thyme but smells and tastes like lemon. Your tastebuds will be tripping. The lady told me I could chose anything except for mint. Mint grows tall and the roots deep, like a weed, and it will take over the soil and sunshine in a garden. Therefore mint should always be planted isolated from other herbs and vegetables.


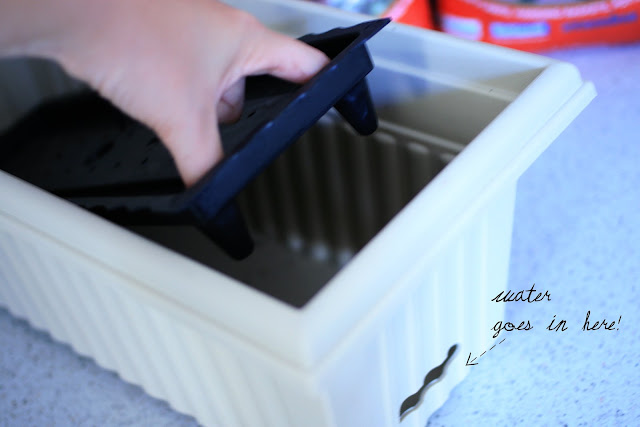
I chose the pot on her recommendation. This pot has a compartment or cavity at the bottom, where water sits and keeps the roots moist. This mechanism prevents both over and underwatering. The big problem with overwatering in case you didn't know, is that if water stagnates around the roots, these will rot and the plant goes to plant heaven. Note: this little cavity might be a breeding ground for mosquitos later in the summer, so if possible it should be covered with a mesh so the air can still flow


Now fill the pot almost to the top with your mix, and I recommend you leave a lot more room than I did in the picture. After wards I had to take about half of that out, I forgot that the plants are attached to some soil of their own as well. 


You have to losen the dirt around the roots a little bit and transfer to the new pot. then cover them up with more of the potting mix. And voila!!! Place them in a spot where the sun will hit directly for most of the day. I guarantee that if your herbs are in partial shade they will die. Been there done that. 


Another tip I learned is to water the herbs once a day either early in the morning or late in the afternoon. Apparently they don't like it if you water them in the middle of the day when the hot sun is blazing.


Yes I named them, so what? Don't you name your pets?