Hello!!!
I haven't forgotten about the blog! In fact the thought of it has been hovering over me and weighing me down, it seems like on a good week I will post 3 times, which would be ideal, but on bad a week I don't post anything juicy or at all :-(
I bet you were expecting lots of adorable cat photos, but you don't even get that, sorry. I have been busy with something all this time, literally, always cleaning something, shopping for something, looking for something, organizing something, going somewhere for something... I did start a couple of DIYs but until they are finished, I don't want to put them here.
Anybody else excited about the holidays?? Hellz yez. When growing up we always had a big dinner party with games and all the family would get together, aunts, uncles, grandparents, cousins, it was awesome and hence I always get a warm homey feeling about Christmas. This year we are hosting dinner for 7 people, and it caught me a bit off-guard how quickly it was suddenly here!
I promise to report back after xmas with gift and dinner details ;-)
HAPPY HOLIDAYS EVERYONE!!!

Thursday, December 23, 2010
Tuesday, December 14, 2010
DIY simple upholstering project
Before I get started, I wanted to announce that the chosen name for that precious kitty is Murka. It was suggested by M's mom and it is a common name for female cats in Russian speaking countries. It means something along the lines of "girl who purrs". At least that is what M says, and I guess I have to trust him on this one because I really like the name. You see, the cat is a purring machine, it just doesn't stop purring, so it is definitely fitting.
Next up is my first attempt at upholstering something! Remember that little stool that I wanted to pair up with my desk? (bottom photo). Well I finally got around it and here it goes.
You will need: a small stool, a pillow or pillow stuffing large enough to fit the stool, scissors, decorative buttons and fabric, a large needle, thread, upholstering tacks/nails and a hammer.
I took my needle and thread and marked the places where I would like my buttons to go, also tightened the threat with a little knot in order to make little dents on the pillow.

I cut the fabric so that it would cover one face of the pillow, and also go just over the edges of it. I held it on the pillow using pins, and proceeded to attach my buttons.

This is a Japanese fabric that I found on sale at the Beehive Gallery...

Then I placed the pillow, fabric side up, on the stool and measured the length of the edges. I started pushing some of those upholstering tacks through the fabric to mark where the edge should be.

Start hammering those suckers in! Always start with the center, and do edges first, leaving room around the corners, leave those for last.

I wanted the fabric to be nice and taught, but the pillow wasn't firm enough, so I just went meh... It fits nicely around the pillow, but it is not by any means taught... maybe next time I should stack up two of those pillows. NOTE: the tighter you make it, the harder it will be to keep the nails in place for hammering.
Then comes the corners... pardon my French but those corners were a bit#h. I took me a long time to figure out what to do, and I am still not really convinced that I did it correctly... I was learning as I went... but basically I tried pulling in the corner tight and folded it under the pillow. Then I brought what I had left over from the edges and tried to fold them nicely and around the corner.
I know it sounds complicated, to me it was, maybe a picture would help:

It is harder than it looks, trust me. Also, the corners came out all different, gives it away that this was a "craft" project.
And finally the end result!

The feet are not crooked, they are adjustable is all. This little gal was helping me all along and she wanted to be in the pictures:


So that's the stool :-)
While I was at it, I took some photos of our favorite part of the house. This is the mantle in our living room, all decked out with a Holiday tree and family photos.

Maybe one day I can show you the rest of our mess...
Saturday, December 11, 2010
Help us choose a name!
This little cutie needs a name! She is one year old, female, very cuddly, confident and curious. Some of the names we are considering are: Sheila and Sydney.
Please help us choose or suggest a name of your own!!!

Please help us choose or suggest a name of your own!!!

Wednesday, December 8, 2010
Lemon thyme vinaigrette
As I mentioned on the last post, we had the chicken with a salad of baby greens, rocket, tomato and green beans. I thought it would be nice to complement the lemon chicken with some lemon thyme in the salad, and Google gave me this.

Once again, I didn't have all of the fancy ingredients so I improvised with what I had already. I think it came out excellently, it is lemoney and thymey and refreshing and mmm, good.

I like to prepare vinaigrettes in a jar so I can mix it by shaking and also to save the left overs in the fridge.
[insert witty closing remark here]
Once again, I didn't have all of the fancy ingredients so I improvised with what I had already. I think it came out excellently, it is lemoney and thymey and refreshing and mmm, good.
I like to prepare vinaigrettes in a jar so I can mix it by shaking and also to save the left overs in the fridge.
[insert witty closing remark here]
A recipe in pictures
I was amassing large quantities of rosemary and lemon thyme, both of which have been put to fine use.
I give you... Rosemary, garlic and lemon chicken.
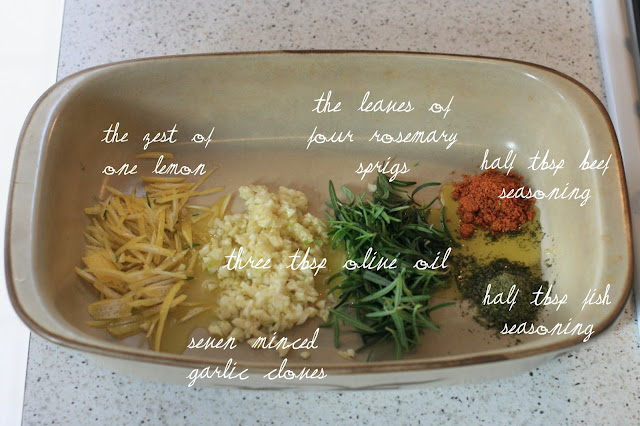
The recipe asked for chicken seasoning, which I had none. So I looked in the pantry and I figured that half of beef seasoning plus half of fish seasoning has to make one fine delicious chicken seasoning. Right?

The you put your dish in the oven for 25 minutes. Then you take it out. Then you squeeze one lemon and pour a half cup of white wine on top of it. Then you put it back in the oven, turn it off and leave it for 5 more minutes.
Voila.

Yes I am aware the chicken in the photo looks like crap, but I assure you that once you serve it on the plate next to a nice little salad, it is ready for gourmet magazine. It tasted pretty good too!
M wished the chicken was crispier.
I wished M would keep certain opinions to himself.
The chicken wished we were vegetarians.
{I will post the lemon thyme recipe tomorrow, that one is a quickie}
I give you... Rosemary, garlic and lemon chicken.
The recipe asked for chicken seasoning, which I had none. So I looked in the pantry and I figured that half of beef seasoning plus half of fish seasoning has to make one fine delicious chicken seasoning. Right?
The you put your dish in the oven for 25 minutes. Then you take it out. Then you squeeze one lemon and pour a half cup of white wine on top of it. Then you put it back in the oven, turn it off and leave it for 5 more minutes.
Voila.
Yes I am aware the chicken in the photo looks like crap, but I assure you that once you serve it on the plate next to a nice little salad, it is ready for gourmet magazine. It tasted pretty good too!
M wished the chicken was crispier.
I wished M would keep certain opinions to himself.
The chicken wished we were vegetarians.
{I will post the lemon thyme recipe tomorrow, that one is a quickie}
Monday, December 6, 2010
Cons of living in Australia #54
Most pople dry their laundry outside (so do we) and hence sometimes you will end up with bugs in your clothes :-S
Subscribe to:
Posts (Atom)