Showing posts with label recipe. Show all posts

Sunday, March 4, 2012

Olive and Rosemary Biscuits

I have a new-found obsession with the Gilt Taste website. Have you been there? It is an online retailer of all things delicious, nutritious and luscious.  I am religious about checking their recipe section several times a week, which explains techniques for many classic and simple yet comforting, tasty dishes.

My latest adventure involved buttery biscuits with olives and rosemary:


Tip: check if your baking powder has an expiration date!


You shape this crumbly mess into a sort of dough and get out the cookie cutters, or glass...


And voila! They are buttery and crumby, which I love, but I expected them to rise even more in the oven. Boooo.... Also if you are going to add olives, make sure you cut down the salt as the olive brine is quite salty as is. 

What kind of biscuit are you?

Wednesday, June 29, 2011

Candied Orange Zest

We had too many oranges at home :-)

Step 1. Cover (loosely) he bottom of a pie dish or baking dish with caster sugar.

Step 2. Wash your oranges really well and dry. Use a citrus peeler, thin or thick, up to you and peel anywhere between 1 to 5 oranges.

Step 3. In a small sauce pan bring 1 cup of sugar, a half cup of water and 3 tablespoons of Cointreau (optional) to a slow boil. Stir to ensure all the sugar has dissolved.

Step 4. Add the orange peels to your boiling syrup and wait until they start to look a bit translucent. Then wait a bit more, for good meaure.

Step 5. Drain (do not rinse!) and toss in the dish with sugar (I used chopsticks for this). Let it set for 5 minutes and toss again. Repeat as many times as you like.


I plan on using it as a topping for delicious baked goods.

Tuesday, May 24, 2011

How to Make a Manhattan

M and I put this together. Make sure you watch in HD if possible!


Not for the faint of heart ;-)

Monday, April 11, 2011

Red Velvet

Last week I met with the ABCD (artists, bloggers, crafters, designers) group of gals of which only a couple I had been following online prior to the meeting.

I'll admit, as lovely as everyone was, I felt out of place because I was literally the only one who wasn't trying to grow a business or make money out of their website. Still some of them however encouraged me to try and come up with a business idea, and said that I should make cakes for people.

Now of course I have thought about this before, but I simply don't feel like I can easily compete with so many amazing pastry chefs out there, or differentiate myself from others who like me, learned their own way to patisserie. Disclaimer: I don't really know what I'm doing when I bake a cake, I follow recipes, not write them, and I often imitate cakes, not create them.

But anyway, after that meeting I just felt like my blog needed one more cake :)

Red velvet cake with cream cheese frosting is a classic, rich, opulent cake, and more importantly, red = awesome.


This time I'm going to walk you through my creative process.

First you need an idea: I should bake a red velvet cake. Check.

Then you need a recipe. I used this one. Check. Then bake the cake, in as many layers as you'd like (I did 3), the general rule is you bake the batter until a toothpick inserted in the middle comes out clean.


I usually take a very sharp knife to cut the top of the cake and make it flat. Then I flip the cake upside down so that the flattened surface is the bottom. If you use a bread/serrated knife you will have crumbs everywhere.

After you make the frosting, you need to frost the cake. The cake must have cooled by now, otherwise the frosting will turn into a watery sugary mess, it is CRUCIAL that the cakes and frosting remain cool at all times. If your kitchen is hot, you might have to put the frosting in the fridge for a few minutes at a time.

Start with the "crumb layer" this is just a thin layer of frosting that gives shape to the cake and keeps it from crumbling too much. I use an icing offset spatula that I got as a present one Christmas.

I also use a decorating turn-table from IKEA, $15. This makes life *way* easier.

After each layer of frosting I put the cake in the fridge for 5-10 minutes to make sure the frosting sets (hey I never said the process was quick).


Next comes the decorating bit! This is the fun part :)

For my inspiration I used the ruffled cake from the Sweet and Saucy homepage. If only I could buy ALL their cake stands.

Anyway, I experimented with a few of my tips and settled on Ateco's No. 46. Then started piping away...


After the fact I decided that I shouldn't have done the top part, it looked a bit bulky. I much prefer the look of the first photo above.

So anyway, then you're done! I took some flowers around the house and slabbed them on top.


Mmm. Cake.

Wednesday, March 16, 2011

Gift ideas

Our cool neighbor friend celebrated a birthday last weekend and we discussed many a gift ideas for this chap. We know he enjoys wine and cocktails, but M and I (mainly I) decided that that was too cliche. We thought of many other nice things available for purchase but didn't want anyone to feel uncomfortable about "buying" something... so instead I thought I could make something!

The gift receiver likes spicy food, he is also Australian born and raised so he likes barbecuing (that's a given for most Aussies), so I thought I could combine both likes into a single spicy, sweet and tangy homemade barbecue sauce!

I have made barbecue sauce before, it is ridiculously simple, but I personalized it and gave it a kick by adding two chopped up chipotle peppers in adobo, plus a little extra of he adobo itself.


We bottled it up and I scribbled some letters on a brown paper bag to create a personalized label (the pixelated area said "from [our address]".

I included the recipe in that little piece of paper that I tied to the bottle, you know, in case he wants to refill it.

This is another excellent reason to always keep your glass bottles and mason jars around. Now you go make something for someone.

PS. The original recipe is here, but remember I added some chipotle peppers in adobo for spice.

Tuesday, February 1, 2011

The new baby (and blue cheese burgers)

It is 2pm and today I have done two loads of laundry, vacuumed the house, cleaned the bathroom, applied to 8 jobs (2 of which already rejected me, that was quick!). It is currently 37 degrees outside and it comes as no surprise that the highlight of my day was the cold shower I took after lunch.

I'm taking a break now by blogging (ok, I won't lie, I'll probably take a nap after this and then pick up the job search again), because I wanted to talk to you about our new baby.

Our new Weber Baby Q120 that is!


So we got this bad boy last Saturday and took some scotch filets out for a spin in it. M won't let me get near it, not because he is mean, he is doing it unconsciously kind of like when someone doesn't let you drive their brand new car. I hope am sure I'll get to play with it when the novelty wears off...

Since I wasn't allowed to grill, I was on salad duty, something else I am equally good at. I made a heirloom tomato salad with mint, basil and feta cheese. It was light, sweet, tasty and the perfect complement to the steaks.


And the next logical step was burgers of course. These shots were taken the day after, and no we're not eating burgers for breakfast, M just happens to be wearing pijama pants in the afternoon.

By the way there is nothing wrong with burgers for breakfast.


These are blue-cheese and sundried tomato burgers, crickey they were good. There were little pockets of blue cheese oozing out from everywhere. Recipe follows:

{ingredients}

(makes 4 massive burger patties)
  • 400 grams lean minced beef
  • 100 grams minced lamb
  • 50 grams crumbled blue cheese
  • 4 sundried tomatoes, chopped
  • 1 long stalk thinly sliced green onions, or 2 small stalks...
  • 3 tablespoons Worcestershire sauce
  • Salt and pepper to taste
  • 1 egg
  • 1 teaspoon minced garlic
{directions}

Wash your hands thoroughly with antibacterial soap. Add all the ingredients in a bowl. Mix them with your hands until homogeneous and divide this big lump into 4 small lumps. Shape each small lump into a burger patty. Cook to your liking.

***

See how M has his head cocked when he is cooking? I call this the business angle because that is how I know he means business.


And the end result:


:-X

Friday, January 7, 2011

Grilled cheese

I found a blog dedicated to grilled cheese sandwiches and started experiencing an uncontrollable craving (similar to the one creeping into you now) to make one.


So I headed to my fridge to see what was available. We always have a couple of nice cheeses at hand, but sadly today, not much else was there.

My grilled cheese consists of basil pesto, chevre with dill, tomatoes, vintage cheddar and dijon.


Doesn't look as good as the ones from Grilled Cheese Social, but it hit the spot and was grilledcheelicious!

Wednesday, December 8, 2010

Lemon thyme vinaigrette

As I mentioned on the last post, we had the chicken with a salad of baby greens, rocket, tomato and green beans. I thought it would be nice to complement the lemon chicken with some lemon thyme in the salad, and Google gave me this.


Once again, I didn't have all of the fancy ingredients so I improvised with what I had already. I think it came out excellently, it is lemoney and thymey and refreshing and mmm, good.


I like to prepare vinaigrettes in a jar so I can mix it by shaking and also to save the left overs in the fridge.

[insert witty closing remark here]

A recipe in pictures

I was amassing large quantities of rosemary and lemon thyme, both of which have been put to fine use.

I give you... Rosemary, garlic and lemon chicken.


The recipe asked for chicken seasoning, which I had none. So I looked in the pantry and I figured that half of beef seasoning plus half of fish seasoning has to make one fine delicious chicken seasoning. Right?


The you put your dish in the oven for 25 minutes. Then you take it out. Then you squeeze one lemon and pour a half cup of white wine on top of it. Then you put it back in the oven, turn it off and leave it for 5 more minutes.


Voila.


Yes I am aware the chicken in the photo looks like crap, but I assure you that once you serve it on the plate next to a nice little salad, it is ready for gourmet magazine. It tasted pretty good too!

M wished the chicken was crispier.

I wished M would keep certain opinions to himself.

The chicken wished we were vegetarians.

{I will post the lemon thyme recipe tomorrow, that one is a quickie}

Tuesday, October 19, 2010

Irish Beef Stew

I'm sick :-(

I went to bed last night with a sore throat and woke up this morning with a cold.

Yesterday there wasn't a single cloud in the sky and the temperature was warm, today the weather is super gloomy and freezing cold. I stayed in bed, taking my meds and drinking fluids all morning and then came across this recipe. Instant craving, I had to have it.

M and I bought a casserole at Victoria's Basement because it was a *super* deal. We have been looking for one for a while but they were all too expensive. Well this one from Benzer was $450 marked down to $70, so we took it home and I had been looking for a stew recipe for some time in order to honor the pot's maiden voyage. Here is where the Irish Beef Stew comes in. I made tiny adjusments to the recipe above, so I will describe my version here.

{ingredients}

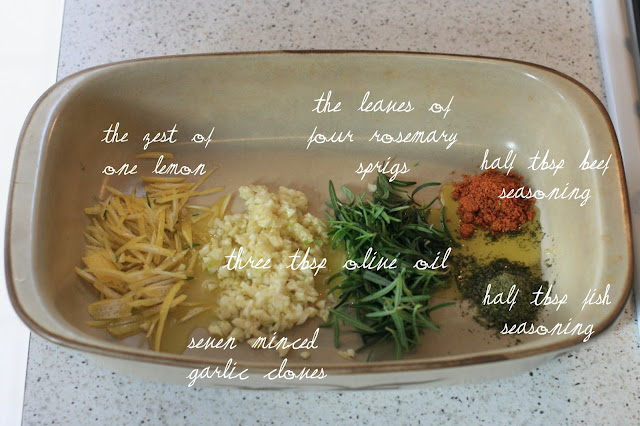
  • 2 generous tablespoons of butter 
  • 2 chopped carrots (roughly 2-3 cups)
  • 1.5 kilos (just over 2 pounds) of chopped potatoes, again, roughly
  • 1 large onion chopped
  • 1/4 cup of olive oil
  • 500 grams of beef chuck for stewing, cut into 3 cm (1 inch) pieces
  • 7 cloves of garlic
  • 6 cups (1.5 liters) of beef stock
  • 1.5 cups of Guiness Ale
  • 1.5 cups of red wine (I used local cabernet sauvignon)
  • 2 tablespoons of tomato paste
  • 1 tablespoon of sugar
  • 1 tablespoon of dried thyme leaves
  • 1 tablespoon of Worcestershire sauce
  • 2 bay leaves


Note: I purchased all the ingredients for less than $25, and the bottle fo wine was $15, making it a $40 meal that serves 4-6 people!!!

{preparation}

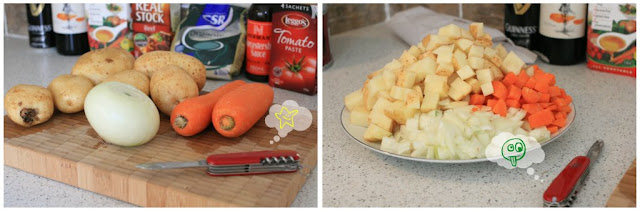
The recipe required the use of two pots, one for cooking the meat and one for the veggies. I only have one pot so I cooked the veggies first and then proceeded with the rest of the recipe.

Clean your veggies and chop them. Notice that I chopped everything, even the beef, with my trusty Swiss army knife! We own nicer knives than that, but they are somewhere in the middle of the ocean on their way to us and I forbid M to buy another new one...


Now if this looks like a lot of vegetables is because it is!!! Next heat up the pot on medium heat and melt the butter. Add the veggies and cook until soft but not completely cooked through... or just for 20 minutes. Stir constantly.


I put the veggies aside and washed the pot. While it was soaking, I went ahead and cut my meat and salted it slightly and chopped my garlic. The meat should be fatty aka marbled (if you want to be fancy), but mine had 2 big chunks of fat that I removed. I also prepared the rest of the ingredients for the stew.

Heat up the pot again on medium heat, add oil and wait for it to be actually hot. You want the meat to sizzle when it hits the pan. I worked in batches like the recipe suggests, you want the meat to brown, not steam. 


When all the pieces were nicely finished I put them all together in the casserole. You add the garlic and it will produces a heavenly smell... try to scrape (with a wooden spoon) the meaty bits at the bottom. If some of them are really stuck, just ad a bit of the beef stock and try again.

At last you add the rest of the ingredients: beef stock, wine, beer, tomato paste, worcestershire sauce, sugar, thyme and bay leaves. Bring to a boil and reduce the heat to low. Cover and simmer for 1 hour. Stir every 20 minutes or so... omg... the aroma... 

We have not forgotten the veggies!!! After the hour has passed add the vegetables and simmer, this time uncovered, for 40 more minutes.


It smells amazing up in here... I scooped out some of the fat that forms at the top, I want to keep this minimally healthy. Finally time to serve, make it special with some parsley, that's right you deserve it.


PS. I used M's Canon 30D to take these shots, so you should see a considerable improvement in blog photo quality!